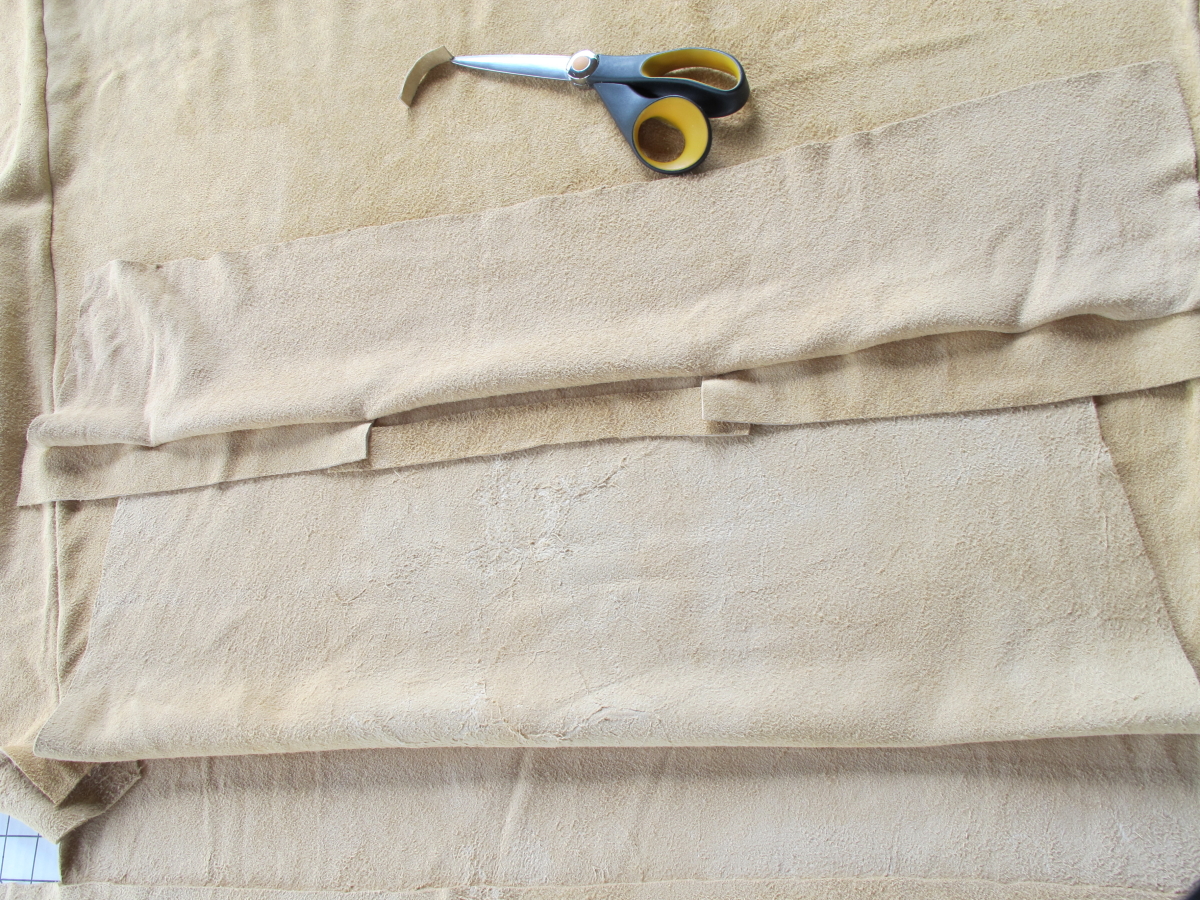
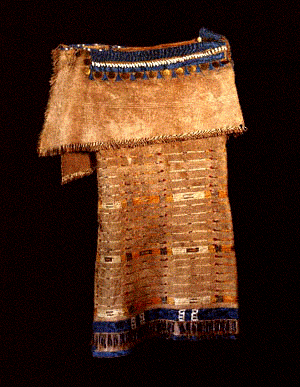
Researching and Re Creating Ancient Pre Contact Deer and Elk Hide Native American Clothing with every step Researched and Documented.
Showing posts with label 1) What Native American Women Wore Pre Contact. Show all posts
Square Notch Fringe On The Two Hide Strap Dress
![]() |
| If you look closely you can see the shoulder lacing in Artificial Sinew |
![]() |
| Adding a tape measure eases cutting concerns |
Rewarding because it finally starts to look like a Native dress, Scary because you cant undo a mistake once you cut.
It helps if you keep a few things in mind:
![]() |
| Square notches are made by cutting ever other fringe off |
Design should be individual and well thought out. I wouldn't copy the museum dress design exactly because it is not my dress.
Design is an individual thing.
The original dress had elements of a pinked edge as well as small fringing on the fold over flap. I decided to go with Square notch all around.
![]() |
| 1/2" and 1" Square Notch Fringe Cut |
I also rounded of the corners of my flaps to eliminate the squared edges, (remember, I made my fold over flaps 28" insted of 22" so I had quite a bit of edge hangover, which suits me fine).
![]() |
| Detail of Large Square Notch, fringe is straight across, skirt is folded funny |
Practice on scraps first!
After fringing you need to place 6 laced fringes into the fold over flap every 4" going all the way through the body of the dress to secure the flap, start your measurement at the center of the flap, 2" then fringe, 4" then fringe, 4inches then Fringe, 4" then fringe.
Repeat for the back.
Try your dress on and have some fun in it, there is still so very much more to do, laced fringe on the bottom and adding the deer tail, (if you didn't make it in the flap to begin with). Then you have to fringe the side seam welts in your choice of design or trim them flush altogether, (your choice).
![]() |
| Six Laced fringes are placed 4" apart across breast, holding flap down |
![]() |
| 28" flap was a good idea, covers those upper arms! |
![]() |
| Looks great from the back too! |
![]() |
| Lovely! |
![]() |
| This project is starting to look like something and is very comfortable too! |
Cutting the Top of The Two Hide Strap Dress
| Two bodice pieces and 4 welts |
The post on this is here.
You have left the top 10 inches of the sides of the dress open for arm openings.
Turning the dress right side out now you will cut two rectangular bodice pieces 22"x6" and four 12"x 2" welts that will become the support for the laced closure.
| Sewn body of dress with bodice and welts positioned |
I decided better to be safe than sorry, I could always have trimmed off the overage if it was too wide.
| Another view showing the overlap on the 5" skirt |
| Bodice laid over welts already in place |
| Bodice folded up to reveal welts |
| Here is the Shoulder welts and neck welt in place on front side of dress flipped down to show it. |
| Front and Back properly pinned |
| Top flipped down to show proper pinning |
The overlap is sewn into the side seams holding the flap down securely.
Now comes the part that is a bit hard to explain and even harder to show in pictures, so I have taken lots of angles to try and get my point across....
Turn the Dress Right side out.
Fold down the front dress body layer to get it out of the way for now.
VERY IMPORTANT! Here is something I added but did not get a picture of, I also cut two 1x10" Neckline Welts and placed them between the shoulder welts and the skirt body to shore up the neckline and eliminate the stretch and bulge of the original.
They are placed in the centered of the body of the dress at the neckline and then the shoulder welts placed overlapping them one inch on either side. Placing them between the welt layer and skirt body layer insures they are innermost next to the skin and held into place by the shoulder
welts. DO NOT OMIT THIS STEP, see large photo below.
Lay the 2x12" Shoulder Welts wrong side down on the wrong side, (inside) of the back of the dress, having the shoulder welts flush with the outside edge of where the bodice fold over flap edges will be and overlapping the center neck welt 1" on either side. (this is for the 28" version from here on).
Lay the bodice 6"x28" piece right side down on top of it and pin across.
Repeat for front of dress reversing order of assembly, (I know this seems complicated, but trust me, when you get to this stage you will see what goes where, just keep pinning it and flipping it over, asking yourself, "Is this right?"
| Flaps lifted to show correct placement (neckline welts not shown) |
| How your back flap should look measurement wise, look at the square board, you can see my museum notes too! |
| Another shot of the assemblage |
| Flap folded up showing a slice of the neck welt in center! Look closely! |
| Success at this point is sweet...but there is so much more to go! Note knee sock belt, Classy! |
I was still wrestling with placing the neck welt reenforcement in, since it was not on the original dress, (or cut out later when the dress was altered), and eventually common sense won out and I put them in.
As an after note, it was a good idea placing the neckline welts, the neckline shows no sign of bulging or stretching, which the original did. They lend tremendous stabilization to the neckline. I'm just sorry I only got one picture of them in place, (and not a very illustrative one at that).
I decided to take a picture of the pre sewn back flap with the measurements clearly drawn out on the square board, (See large picture below). You should have an 8" centered neck opening and then 7" on either side of the 22" dress body itself.
Underneath the 10 inch neck flap overlaps one inch on either side of the 8" mark.
The rest of the bodice flap is either ends at this 22" mark, or if you made the flap wider, (as I did), the flaps and welts expend out o the picture but are welted flush to the ends of the flap too, regardless of how wide they are.
note: This handy square board is sold at Joannes for $7.00 and worth it's weight in gold, they are 3'x72" and I can cut them to pieces, draw on them, throw it out and get another instead of buying an $80.00 quilters square board that isn't as big, harder to fold up and stash and will get ruined in no time anyway the way I run through projects!).
Now, whip stitch through all layers on first the front and then the back.
Stitch temporary lacing joining the front and back shoulder welts leaving about a half inch gap filled with your lacing, (you will redo the lacing afterwards, or just leave it as I did, it looked so good!).
Throw the dress on the form and take a look at a 500+ year old dress design come back to life!
Another Important Note:
The original dress had the deer tail sewn as an actual part of the front and back fold over flap, 5" wide and welt sewn onto the 22" wide front and back fold over flap at the edge of the 22" width. (see Photo above showing my notebook, you can see the tail is actually part of the fold over flap itself).
Since I decided to make my shoulder fold over flaps 28" wide the deer tail would have been over the shoulder and down the arm at a weird angle. I decided that for my dress I would make a deer tail and sew on later at a more favorable spot.
Two Hide Strap Dress Top Delemma Resolved
| Left Shoulder Laced tightly with Boot lacing |
When I first started researching this dress long ago, I could tell something was amiss with the top of the dress when I received the photo on the right from the museum.Tradition says the sleeves were always worn on the outside of the dress so they could be removed as the day warmed up and tasks for which bare arms were called for arose.
| Right shoulder showing original Lacing holes |
This did not hold with oral tradition. Many early authors observed that the sleeves were easily shrugged off when hard or dirty work was at hand that would damage or soil them. The way the dress was displayed in this photo by the museum did not agree with this oft repeated testimony.
| Yoke showing the later notched out neckline |
The lacing was threaded and snugged up through the thickest part of the fold over creating a stiff lumpy mass of leather that the fitted sleeves would not cover without some discomfiture.
I could also see that it was not the original intended design because of the ill placed leather strap thongs where lacing once existed on the right shoulder. Originally he top of the dress was joined by lacing both sides of the shoulder as was evidenced by the holes left from the lacing in the welted flap.
In order to wear the dress properly, one would have originally laced at least a two inch gap between front and back piece. The the yoke of the dress would fall lower on the breast and not bunch at the shoulder and neckline. If worn as shown, the neck of the dress would literally saw you off at the neck line and the bulk of the two welted seams jutting off the shoulder would make wearing the sleeves on the outside impossible. Something had been done to seriously alter the original design of the dress.
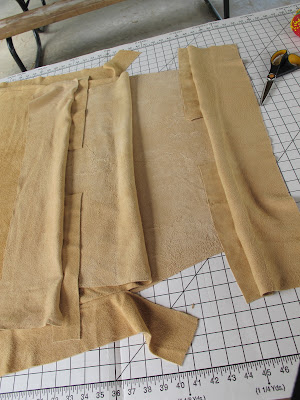
| Two inch shoulder welts in place, narrow welt at neckline |
This was a poor solution at best, the neck cut out was not deep enough to be effective and the resulting weakness of not having the re enforcement of the continuous welted seam joining the dress and flap caused the neck edge to bulge out and still cause irritation, (sweat stains in the adam's apple area tell the whole story of how this neck edge still abraded the throat, as well as an afterthought dart was cut and sewn perpendicular in the center of the neck hole in the front under the flap to try to reduce the resultant bulging).
I can't fault the original seamstress for this problem, she was obviously an expert and very meticulous in every detail of the garment and accessories, how this neck design problem came to be was probably a result of the person who later wore it and realized it wasn't comfortable enough for them, (especially when they used boot lacing to replace the original soft brain tan lacing), and then took it upon themselves to redesigned it. The original seamstress would have taken the garment apart and remade it correctly, rather than cut out the seam that re enforces the entire top of the dress yoke.
The decision that the remake was amateur was further enforced when I realized the lacing was at some time replaced with commercial boot lacing and not the soft brain tan lacing that would have been used in the first place.
I came to this conclusion after months of deliberation, (This being the sole reason for my not charging right into this project), I finally put myself in the shoes of the originator and realized that as talented as she was, she would never had made this amateur correction, she would have simply opened up the welt seam, add a wider welt and use it for the structure on which the lacing wends. That way the lacing would span perhaps half an inch and the integral structure of the garment would remain in place and at the same time making it more comfortable for the wearer, yet retaining the lacing design of the original.
It was difficult for me to make this decision, after all, I was departing from the original design. But when design weakness so obviously shows itself, one can't in good conscience repeat the purposely and ignorantly created flaw.
I know the creator would have corrected it herself had she been given the opportunity to do so. Perhaps the dress was gifted, or passed on to a younger relative who through time made the horrific adjustments of adding leather boot lace and adding leather thongs through innocent ignorance.
The garment shows the dress was well worn, perhaps by two or three generations in succession and the needed talents of sewing were found wanting in later generations. We will probably never know the real story and I can't entirely fault their ignorance because at least they had the wherewithal to passed the garment on so that today I stand am able dumbfounded before it. I am eternally grateful to them for keeping it safe in any form for me to study and try to humbly reproduce.
The thought of extending the welts to two inches on both the front and the back flap on which to tie the lacing does a couple of good things for this dress.
First, the lacing gap is only a half inch wide and so does not dig into the shoulder and negates any future digging in or sagging, (or replacement with boot lacing).
Second, the bulk of the welted seam drops lower across the front of the breast, allowing the sleeved coat to ride naturally on the shoulders and not get lumped up on the thickness of the triple leather seam.
Third, the welt is a single layer that drapes across and down over the tip of the shoulder smoothly, creating a soft capping, whereas the triple bulk of the fold over jutted angrily off the point of the shoulder a poked out at an alarming angle making the sleeves impossible to wear on the outside of the garment. (This explains why the museum placed the sleeves improperly on the inside of the dress instead of outside where they would normally be).
Taking liberties with design is not something that I do lightly, it took me months to allow myself to go forward with my decision to change an obviously flawed part of an almost perfect garment.
Now that I have done this, I take all blame and any complaints that I have somehow made this garment less faithful to the original, but I know in my heart that now that I have done it, the original seamstress is smiling down on me from somewhere that I did my best to remake the dress in her image of beauty and serviceability. And the sleeves now fit smoothly over the dress where they belong.
Cutting Hide on the Body of the Two Hide Pre Contact Strap Dress
| Cutting Hide outside is always a good idea! |
46" Long
22" Wide at the top
38" Wide at the bottom
Note: I had to cut out a 22"x36" skirt top and then add a 15" long piece at the bottom, overlapping 5", as my hides were too short to get the full length, (this was commonly done). The 5" overlap will be used to create a scalloped edge later.
Cut two 3" x45" Welts
Cut two 28" wedge shaped placards, 5" wide at the bottom and 1" wide at the top.
| 45" welt and Wedge Placard in place aligned with hem |
| Welt and placard pinned to back edge of skirt |
| Wedge Placard Folded |
| Wedge welt placed on top wrong side down |
Fold back the top hide to reveal the side edges and place your long welt on the hide right side to back right side aligning with the hem.
Place you wedge Placard on top of the welt right side to back right side and align with hem trimming all pieces so the match up straight and even.
So the order would be Bottom skirt piece right side up, then long welt right side down, then wedge placard right side down.
Pin both wedge placard and welt to the back of the skirt to the top of wedge placard, placing your pins about 1/2" in and running parallel to the edge.
| Be sure your edges are straight and even |
| This is how the wedge placard should look when pinned properly |
| Wedge placard apex where everything comes together |
Fold the Placard Wedge over so the edges line up the length of the wedge.
Place the 29" tapered wedge welt wrong side down over the folded wedge aligning the edges, trimming all edges to match.
Fold the Top Dress skirt piece over all layers and pin wedge placard, wedge welt and skirt top together from hem to within 10" of top of skirt 1/2" inch from edge and pins running parallel to edge.
Trim all pieces to be flush and straight to each other.
Repeat procedure for the other side of dress skirt.
Notes:
I cut the hides for the skirt dress neck of the elk side up so I could take advantage of the gradual wide tapering width of the natural hide.
This gave me the advantage of the hides being thinner at the top which would be desirable since you want the weight of the heaviest part of the hide at the bottom to pull the dress straight and the lighter part above since it will be cinched at the waist, having less bulk by doing so.
This would differ from the tradition of hanging all hides neck down, but I have noted exceptions to this rule when it came to multiple piece skirts such as this one, hides were placed and cut according to what ever shape and thickness best suited the design and made best use of the materials at hand.
Recreating A Two Hide Pre Contact Ojibwe/Cree Strap Dress
![]() |
| Two Hide Strap Dress |
![]() |
| On Display |
| Dress Body |
This dress has never been seen in any pictures in full color, so for the first time any where, feast your eyes on the beautiful Vermillion Red painted Dress, Sleeves, Hood and Leggings!
The painting was done by using just the fingers as a brush, so you can actually see the fingerprints of the creator in the paint.
| Leggings |
I also made a video about documenting the details of construction and will be releasing that at a later date.
This dress was collected in Canada in the 1890's and has been cataloged as being both Ojibway and Cree.
It has elements of both cultures so I don't think we will ever really know its exact history, but with my examination, we can recreate this wonderful pre contact garment!
I will be fist recreating this garment in Vegetable Tan Elk Hide and then in Brain Tan, once I work out the kinks in the pattern.
| Sleeves |
This does not make it a true Strap Dress per se as the sides are cut out for the arms at the side seams, where most Modern Strap Dresses are suspended low enough on the breast to not make the armpit cuts necessary.
| Hood |
Another mystery is the placement of two tails at the breast line, (one on the front and one on the back), normally one would place one tail on the front at the right shoulder to pay homage to the original one hide wrap around dress that predicated this garment.
Stay tuned as I show more photographs and show step by step how this wonderful garment was created!
| Could I be any happier? |
What Native American Women Wore - Pre Contact: Side Fold One Hide Dress
The True Side fold dress is always a one hide dress wrapped around the body with an armhole cut in the folded side and the side seam left open on the seam side to accommodate the arm.
Many Off The Shoulder dresses are wrongly categorized as side fold dresses as the construction is very similar, the difference being the hole obviously cut on the fold side to allow the arm through.
These dresses were popular on and off through history in between the Off The Shoulder and Strap Dress Era. They obviously were limited to those tribes who had access to very large hides such as Elk and Buffalo.
No evidence of detachable sleeves or leggings are present.
Catalogue Description of the dress above: This side fold dress consists of six pieces: the main body of the dress, the flounce, the shoulder flap, the top bodice, and two hide things as a second shoulder strap. The horizontal seam is low and the folded over portion is shorter and would barely cover the breast. The folded over flap is even shorter in the back. The hide is worked so that the flesh side of the skin lies against the wearer, with the fur side out. The flounce is laced with hide thong. The seam of the dress, the blue and white pony beads on the shoulder strap, and the hem tabs are all sewn. It is likely that the two bottom tabs at the left side of the dress are formed from a remnant of the foreleg of the animal or are a decorative form to resemble this pattern technique. Ten quilled stripes are worked around the skirt of the dress, horizontally, in measured registers of blue (once blue-green but faded since original BMA acquisition) and brown quill, separated by shorter sections of white porcupine quill where red tufts, once the tassels, of yarn emerge. Small black lines separate each quilled section. Some vertical marks of what is probably ochre appear at the ends of the quilled bands. Tin cones and a few copper cones are sewn to the bottom of the flounce, more or less at knee length, and on the two bottom tabs, which are further elaborated with an edging of blue and white beads. Five pairs of copper cones are sewn up the side seam. If the shoulder strap is examined from above, blue and white beads can be seen ornamenting the seams. A single row or blue beads edges the sides while the front and back seams display eight bands of two rows of white beads alternating with two rows of blue pony beads. See Jarvis supplemental file in Arts of Americas office.
The side-fold style seems to have been worn by Dakota, Lakota, and Cree women, and possibly also by Cheyenne and Assiniboin women. Lewis and Clark are known to have encountered a party of Cree at Fort Mandan during November of 1804. This two-hide dress has been impressed and painted with red and dark brown pigment, a decorative convention among some Cree groups. However, it is also possible that this dress was made by a woman from the Upper Missouri area.
Indigo and blue-green beaded discs adorn the yoke and a beaded strip has been added to the skirt. The hem is tabbed and the skirt fringe was originally wrapped with dyed orange quills.
Woman's Side Fold Dress
Central Plains/Upper Missouri River (Sioux or Cheyenne?)
Large mammal hide (elk?), horse hair, porcupine quills, bird quills, unidentified plant fiber, glass beads, brass buttons, cowry shells (Cyprea montea), tin-plated tinklers, red wool, pigments, glue sizing, woven wool tape.
Central Plains/Upper Missouri River (Sioux or Cheyenne?)
Large mammal hide (elk?), horse hair, porcupine quills, bird quills, unidentified plant fiber, glass beads, brass buttons, cowry shells (Cyprea montea), tin-plated tinklers, red wool, pigments, glue sizing, woven wool tape.
This elaborate two-piece, side-fold dress (see previous object, catalogue no. 53046) is decorated in part with dyed porcupine quills and cowrie shells, materials having a long history of use in native North America (although these cowrie, an Indo-Pacific species, must have been imported for trade). The brass buttons, red wool, glass beads, cone tinklers, and pigment were trade goods that came into vogue during the eighteenth and nineteenth centuries. The English gilt brass buttons on the yoke, like the metal trade tokens issued by fur trading companies, were popular decorative elements and status markers during the early nineteenth century. Lewis and Clark noted that brass buttons were more highly sought than all other items save beads. George Catlin painted several Lakota women, one the wife of a trader, displaying rows of such brass disks on their dresses. This is a special occasion dress, worn especially for dancing.
The yoke of this dress has been impressed into a geometric pattern and then painted with clear sizing or hoof glue, a decorative treatment of hide practiced by several central Plains groups including the Cheyenne and the Hidatsa. The rows of horizontal quill work punctuated by red wool "tufts," as well as the arrangement of the brass buttons, suggest that this dress may have been made by a Cheyenne, Dakota or Lakota woman.
This may be the dress given to the Peale Museum by the Hutter family in 1828 and described in the Peale ledger as a "Soux squaws dress." Clark also acquired a dress on the expedition that he described as "an Indian dress, such as the Soues women ware [sic] in their dances." He presented that dress to first lady Dolley Madison.
http://140.247.102.177/Lewis_and_Clark/dresslg.html
Subscribe to:
Posts (Atom)