Fuzzy Fringe on the Two Hide Dress, How Was it Done?

Mink, George Catlin, showing fuzzy fringe edge at neckline and on edges of hide

Arikara Dress showing patches of fur along bottom edge as well as softened fringe
Take a close look at the edges of the hides used for the Two Hide dress, especially in the Arikara dress. (You can click on the picture and then zoom in on it further, I purposely left it larger to show detail).

Long fringe, twisted fringe and short fringe feathered sharp cut edge on far right
You will note that there seems to be a fringe of fur all around the edge. Well at least in some places. The hide around the fold over flap purposely has the hair left on, as well as the tail being left on as a focal point. But the edge of the entire dress is softened somehow, without being sharply fringed.

George Catlin's paintings also illustrate the fuzzy edge in places, (like the neckline), that would be cut out of the inner and not on the edge of the hide. Where did the fuzz come from? Couldn't Catlin paint fringe? I think he could. His paintings are so detailed you can see the individual beads and porcupine quills.

So what's going on here? I think they deliberately frayed the edges. It would soften the look and make the edges more pliable and improve the drape.

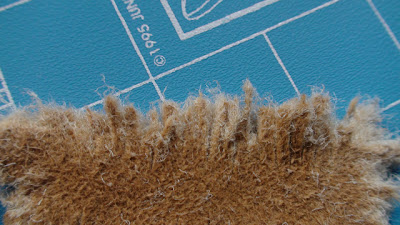
Close up, sorry about focus entire edge of fringe and cut edge brushed
Sharp cut edge on left, rest feathered.

On that line of thought, I took a scrap piece of my brain tan and made some experiments.

I cut long fringe, long twisted fringe and short fringe. I then took a wire brush and lightly teased the edges. These pictures are my results.

I got a bit carried away, but as you can see, the brushing greatly improved the softness of the edge of the hide, note the hard sharp cut edge to the far right of the first picture and the left edge of the bottom picture.

Did they use wire brushes? Probably not. Wire making was in its infancy at this time and was very expensive.

Did they have a tool that could create the same result? Thinking of porcupine brushes and other stiff bristled objects they had, maybe so.

The best looking fuzzy edge was made by making 1/4 inch cuts to the flesh side of the leather with my rotary cutter, (yes, I am aware they did not have one of those either, but so be it), Then I lightly teased the flesh side, flipped it over and teased the front. The results are the center(second) picture, look on the top edge of the hide in the center of the picture, slightly to the right. It gave a fine result, and the leather became oh so much more pliable.

Further testing has supplied the following results:

1/4 inch fringe cut from flesh side on top 1/2 inch fringe on bottom

I then scrunched it, twisted it, balled it up to see what wear would do

1/4 inch fringe on a curve, also roughed up afterwards
As you can see, it has produced the desired effect, and has considerably loosen up the edge. I just lightly teased the edge, I think the same results could be obtained using an ordinary finger brush, (albeit a little more elbow grease required). I cut less than 1/16 inch wide fringe, and a better look came from using the rotary cutter on the flesh side.

If you are interested in the process and have an opinion or suggestion, I would sure like to hear from you on this. Please leave a comment, I value your input.

A note aside, if you try this method, fluff outside. It creates a tremendous amount of fuzz in the air and on clothing.

Period Correct Native American Beads (Tile Beads)

I am reprinting this article from the internet for educational purposes...Seed Beads in the Northwest

Art. II. Seed Beads in the Northwest.

In which J. GOTTFRED presents information on small glass beads based on the archaeological evidence from Fort George (1792-1800), Rocky Mountain House (1799-1821), and the Boyer Post and Aspen House sites (1788-1802)


There is some confusion among re-enactors concerning what beads are correct to use for beadwork decoration on reproduction clothing and other items dating to before 1821. In this article I will present information from three archeological reports concerning small glass beads found at fur trade sites dating from 1788-1821. I will also discuss what modern beads are the closest to these historic beads in size, shape, and color.
Some of the confusion regarding small beads comes from the fact that people use the same terms to describe different beads. Modern seed beads are classified by size number. Usually, seed bead sizes range from size 2 (large) to size 14 (tiny). Size 2 beads are almost as big as a modern pony bead, while the size 14 beads are about a millimeter in diameter. The most popular size with modern craft workers seems to be size 10, with a diameter of about 2.5 mm. Today's 'pony beads' or 'crow beads' are large beads, usually plastic, with a large hole and a diameter of 9 mm. They are often used to decorate fancy bandannas and leather fringes.
Historic seed beads are defined as being under 2.0 mm in diameter (Nobel, 143). Historic 'pony' or 'pound' beads are larger than 2.0 mm, generally between 2.0 and 4.0 mm (Kidd, 175). Modern size 6 to size 10 beads are the same diameter as historic pony beads, while modern seed bead sizes 11 to 14 have the same diameter as historic seed beads. There does not appear to be a historic analog to modern pony beads, although there were other types of large beads.

Beads at Fort George 1792-1800

Fort George was a North West Company post located on the North Saskatchewan River near the town of Elk Point, Alberta. It operated from 1792 to 1800.
During the years 1965 to 1967, 20,588 small glass beads were recovered from the Fort George site (Kidd, 175). Most of them were 'pound beads' or 'pony beads', with diameters generally between 2 and 4 mm (Kidd, 175). (A size 10 seed bead is about 2.5 mm in diameter, while a size 6 seed bead is roughly 4.4 mm in diameter.)
The archeologists further classified the beads into three shape categories, 'flat' beads have diameters greater than their length, 'square' beads are as long as they are wide, and 'elongated' beads are longer than their diameter. Most modern seed beads are 'flat'.
At Fort George, the three shape categories broke down in the following way (from data in Kidd, 176):

Unlike modern beads, two thirds of the small beads have a 'square' profile. Modern beads also have more rounded edges (shaped like car tires), where as the historic beads had square edges, more like modern 'cut' beads (like short lengths of pipe). It should also be noted that the historic beads were much less regular in size than modern beads.

The main colors of the beads excavated at Fort George were white and blue. Two-thirds of the remainder were red, while green and wine-colored beads made up most of the rest.
Beads at Rocky Mountain House, 1799-1821

Rocky Mountain House was a North West Company post located on the North Saskatchewan River just south of the town of Rocky Mountain House, Alberta. It was open from 1799-1821.
The site yielded 151 seed beads less than 2 mm in diameter, and 10,539 'square' beads with diameters ranging from 2.1 to 4.0 mm (Noble, 145). At Rocky Mountain House, most of the beads were 'square' ; only 176 beads were 'flat'.
Noble notes that 'the comparatively low number of seed beads at Rocky Mountain House is in contradistinction to bead samples from other historic forts' and that the 'data suggests that the Rocky Mountain House seed bead sample is very low. This may be a function of time, different suppliers or simply due to a preference on the part of the Indians.' (Noble, 144-145)
They found 10,522 beads at Rocky Mountain House. Blue beads made up 69% of these beads, and white beads were the remaining 31%. There were also 17 red beads.

Beads at the Boyer Post and Aspen House sites (1788-1802)

The Boyer Post and Aspen House were North West Company posts located at the forks of the Boyer and Peace Rivers in Northern Alberta. The site is very near Fort Vermilion, Alberta.
Only 73 beads were recovered from the site, but their color distribution is similar to the other sites' with the vast majority of beads being evenly split between white and blue, with remainder composed of red and yellow in equal proportions.

Combined Data

If we combine the small bead data from all three sites, we find that out of a total of 31,138 beads, 57% are white, and 29% are blue. The remaining 14% is predominantly red.

Analysis of Bead Patterns

Museums contain many different examples of beadwork patterns. Unfortunately, most of these items date from the late 19th or early 20th centuries. However, if we assume that they are representative of earlier patterns, it might be interesting to compare the representation of bead colors in these patterns to the distribution of bead colors at archaeological sites. I will present a breakdown of two geometric patterns that I have reproduced from historic examples.
The first is a reproduction beaded strip from the arms of a Plains Cree man's shirt that used 14,400 modern size 10 beads. The pattern consisted of pairs of yellow triangles bordered in black on a white background.

The second example is of a beaded strip from the front of a Blackfoot man's shirt. This is a variation of the Blackfoot 'mountain' pattern, which might be described as blue triangles bordered with black borders and colored details on a white background. I have reproduced one pattern of 4,384 size 10 beads. When extrapolated to the size of the original garment's beaded strip, this pattern would comprise some 35,072 beads with the following color breakdown :

The color distributions of the two patterns are similar to the color distribution of the beads from the three historic sites, and would suggest that historic bead patterns were of the same general form, namely a background field of white, with predominantly blue colored designs placed at regular intervals within the field.

Conclusions

Historically, the term 'seed bead' refers to beads less than 2 mm in diameter. The historic term 'pony bead' refers to beads of between 2 mm and 4 mm in diameter, but the beads craft stores call pony beads are usually much bigger than that. Historic 'pony beads' correspond in size to modern size 6 to size 10 seed beads. (2-4 mm diameter). In scaled photographs of pony beads from the Fort George and Boyer/Aspen sites, most correspond to modern size 6 seed beads (4 mm diameter).
Most beads were white and blue. This may indicate that these two colors were preferred for use as the background colors for fully beaded designs.
Two-thirds of historic beads were of the 'square' form, with the remainder split between 'flat' and 'elongated' forms.
For the re-enactor, this data would suggest that beadwork consistent with archeological evidence covering the period 1792-1821 in Alberta would use modern size 6 (4mm) seed beads, in patterns using white or blue as the main or background color, with periodic designs of yellow, red, black, green, or wine.
The greatest challenge to the re-enactor is obtaining 'square' type beads. Using 'flat' forms would not be totally inconsistent with the archeological record, but I suspect that a pattern made only with 'flat' beads would not be typical for the time. Modern seed beads have rounded edges and are very flat. The most common historic beads were more 'square', and had edges that were generally much less rounded than the edges of modern beads.

References

Kidd, Robert S., Fort George and the Early Fur Trade in Alberta. Provincial Museum and Archives of Alberta Publication No. 2, 1970
Noble, William C., 'The Excavation and Historical Identification of Rocky Mountain House' in Canadian Historic Sites : Occasional Papers in Archaeology and History No. 6. National Historic Sites Service, National and Historic Parks Branch, Department of Indian Affairs and Northern Development. Ottawa, 1973. pp. 56-163
Pyszczyk, Heinz W., 'A 'Parchment Skin' is All : The Archaeology of the Boyer River Site, Fort Vermilion, Alberta' in The Uncovered Past : Roots of Northern Alberta Societies, Patricia A McCormack, ed. Circumpolar Research Series Number 3, Canadian Circumpolar Institute, University of Alberta, Edmonton, 1993. pp.33-44.

Copyright 1994-2002 Northwest Journal ISSN 1206-4203.

Here is a picture of tile beads, currently Crazy Crow has them in these colors and they have a large selection of colors, they are made in India:


 They are also available from Native Essence made in Czechloslovakia, a better quality and therefore more expensive, also only available in black and white at this time

History Of Trade Beads Chart


This is Just a Preview, Click on link to see actual chart!
This Chart is much too large to display here, please click on the link above to see it!

Chevron Or Rosetta Star Beads 1500-1900


My Collection, a Mix of Old and New Red, White and Blue Chevrons
My matched strand from the same cane
I always promised myself I wouldn't get hooked on Beads, but sooner or later you just have to have something to wear with your red, white and blue regalia and I just couldn't help but fall in love with these Chevrons I have collected over the past few years. I finally have them strung up in a useable and ascetic form and can't wait to try them on when I am all "Dressed Up".

My collection consists of a long strand of matched graduated old seven layer beads, a small strand of mixed old leftover beads and a modern strand of beads featuring a new bead I call the "Mirror Ball".

Here is some research I found on my beads, I found the sources very interesting and have provided links to the most interesting ones.:


CHEVRONS are probably the best known, oldest and most interesting historic trade bead. Often called ‘star’ beads or ‘chevrons’ by Spanish traders, these artifacts are quintessential fur trade relics - but yet they are rarely found in Canada and North US. They were traded here, but very early in the game.
Chevrons were traded with African tribes for slaves and ivory, and Native Americans, primarily in southwest Arizona. Blue and red chevrons are listed among the supplies of Coronado and his conquistadors in the year 1540 in what is today Arizona. These are prized beads - but they are rarely found in the fur belt. Some authors believe they were bought and traded by the Hudson's Bay Company early in the history of that venerated company - before glass making became common in England. There's also an interesting story which details how the exact recipe and process for making Chevrons (all fifteen steps) was one of the great industrial secrets to escape the Republic of Venice when several highly skilled glassblowers escaped from the Island of Murano to migrate north to Germany in the early 1600’s. The mills of Bohemia made the manufacture of these complicated beads more practical as a single necklace required hours of grinding – remember the beads start life as long sticks of glass that are broken into bits and ground into small spherical shapes.


Chevron Beads were traded throughout the world from the late 15th century. Christopher Columbus is said to have traded Chevrons when discovering the New World. They were introduced into Africa by Dutch merchants. The first specimens were created by glass bead makers in Venice and Murano Italy. Chevrons were originally called Rosetta beads, or star beads. The word Rosetta first appears in the inventory of the Barovier Glass works in Murano in 1496.


Massive Venetian Chevron  -  Circa 1480 1580 - Rediscovered in the Congo1983. Measures 7.7 cms x  5 cms. Weight: 288 gms.


Chevron beads were traditionally made up of red, blue and white layers. A smaller number of chevron beads were produced in green, black and yellow. (above) Chevrons were 'drawn beads', made from glass 'canes' created in specifically constructed star mould. Star moulds are known to have had between 5 and 18 points. Typically, four to seven layers of different coloured glass was added to the mould, conforming to the star mould. Metal plates were affixed to the hot glass which was then 'drawn' into a long rod called 'canes', by pulling from either in opposite directions. A bubble which had been blown into the centre of the original molten ball of glass formed the hole in the cane and beads perforation. The diameter of the cane or beads was determined by how thin the glass was drawn out. The cooled cane was cut into bead sizes, revealing a star pattern at either cut section. Each end was then ground or faceted to enhance and display the star chevron pattern. Star beads with flat ends are more correctly known as 'Rosetta star beads'.


The first known Chevrons typically had seven layers and six facets. Over time and through use, an inner layer would sometimes wear away. By the beginning of the 20th century, four and six layer chevron beads appeared on various bead sample cards. Small quantities of chevron beads continue to be made in Venice today.


Above, a selection of very large chevrons collected in Shaba Zaire (Conge DRC) during the most part of the 1990's. At the top is the largest 7 layered example we found. The centre necklace is made up entirely of seven layered Chevrons, while the outer two examples date to early 20th century trade. These beads were re-discovered individually. They would have entered the remote region through river sources, leading up from the mouth of the Congo River. Imagine the history they have seen!

Preparing and Sewing With Real Back Strap Deer Sinew

Fibers being loosened, dry method
There are two methods for loosening fibers from the solid dried backstrap of a deer.

One way is to grasp the strap firmly between the hands and briskly twist and scrub the fibers until they loosen on their own.

This will result in blisters and incredible pain on your fingers. Use gloves if you insist on loosing fibers this way.

Fibers loosened dry method
The next way, and the way I recommend, is to soak the strap in lukewarm water for half and hour and then start peeling off the fibers. I promise it will not dissolve or weaken the thread!

The fibers come loose with less fraying and you can get a more and longer consistent thread.

Fibers loosened wet method not rolled yet
I generally separate threads until they are small enough to fit through the eye of a glover's needle, this makes them four fibers or so thick. A glover's Needle has a tri-corned point and is exceptionally easy to push through hide, they are available at any craft store and sometimes even Walmart!

Once you have your fibers separated, if you haven't soaked them yet, do it now, (they won't dissolve, this is not spaghetti here).

The you take each fiber, grasp it at the tip of heavier end with your left hand and roll the fiber on your right thigh briskly a couple of times to remove water and to twist the fiber and stretch the thread.

Fibers twisted by rolling wet on thight
Lay each thread flat on a surface to dry. Once dry you can either roll each thread into a loop and store this way, (traditional), or you can just bundle loosely until needed to sew with.

When using for sewing you can punch holes with an awl and push the dry thread through, or you can dampen the loosely coiled thread in your mouth, (traditional) and thread it on a needle and sew away.

Fibers separated according to size, yield of one strap
If you damped the fiber, sew loosely as it will shrink a bit on drying.

This makes a very tough thread, I have been in museums where the cloth thread is falling apart, (cotton thread has a 75 year life, silk even less), and the sinew still looked fresh!

Some people oil the fibers or use beeswax on them, especially black beeswax, this keeps the fibers more pliable, I recommend wax, but frown on oil, it will eventually bleed onto the garment and leave a stain.

Raw straps and fibers from one strap
I have just used them as they are and have had no problems, try it waxed or dry and see what works best for you, to wax, you melt the it and dip the thread, then roll against the thigh again to remove excess wax. Warning! This can be messy!


I do not recommend artificial sinew of any kind, not only isn't it historically correct, it is plastic garbage and won't hold a decent knot.

If you are going to do a historical garment , go the whole way and do it right! It's not that difficult!


Research on The Eastern One Shoulder Hide Dress

Discovery of the Day! I watched a PBS Series last night about First contact between Native and European peoples on the continent and it led me to do some more searches for tribe specific clothing.

I began my search for the Wampanoag people, the Natives who interacted with the so called "Pilgrims" of Plymouth rock and Thanksgiving fame.

I came across this site linked in the pictures below to a Native reenactment village where they are actually wearing the garment I will be recreating soon.

I was thrilled to find that the arm closure I documented on Mia's actual dress was authentic, and the manner of attaching the shoulder correct.

This is a big moment for me, as the garment had been modified to include a button closure, something I was not comfortable with using, (I never have seen button closures used in pre contact clothing).
But, the garment DID have mysterious slits on either end of the fold-over that implied a drawstring to me, and when I repaired it, I did add the leather drawstring, but left the button closure as I did not want to over-alter the dress, (it was not mine, after all).

I have been searching ever since for the actual closure, and these pictures show the leather thong strap closure I have been thinking of all along and was evidenced in the actual garment I studied. It lends a graceful closure to the over-the-shoulder attachment, and will look stunning!

Here are more photos and links to the actual page where I found my material for this article, I will be ever grateful to the Wampanoag for keeping their historical clothing alive!
The following is their sites wording and not mine:

Erinn sewing homesite
Unlike the people you’ll meet in the 17th-Century English Village, the staff in the Wampanoag Homesite are not role players. They are all Native People  - either Wampanoag or from other Native Nations - and they will be dressed in historically accurate clothing, mostly made of deerskin. They speak from a modern perspective about Wampanoag history and culture. They are happy to see you and will invite you inside a wetu, or tell you what they are growing in the garden, or show you how to play hubbub, an ancient tribal game still enjoyed by many Wampanoag today. The staff in the Wampanoag Homesite are very proud of their Native heritage, and knowledgeable of the traditions, stories, technology, pasttimes, music and dance of the people who have lived in this region for more than 10,000 years. Ask lots of questions! You may be surprised what you will learn.


Wampanoag woman and child Plimoth PlantationPhoto copyright Rusty Moore.12. You don't look like the images of Native People I've seen in movies and books. Are you a "real Indian" 
Those of us dressed in deerskin clothing on the Wampanoag Homesite are all Native People - a term we prefer over "Indian" or even "Native American". Most are Wampanoag, but a few people are from other Native Nations. Many images of Native People in movies depict Native stereotypes. But there are actually many different Native Peoples throughout the Country, with a variety of different physical features as well as different lifestyles.
If you want to know about our heritage, just ask us: "What Native Nation are you from?" We'd be happy to talk with you about it.
 2.  Who will I meet at the Wampanoag Homesite?
All of the staff in the Homesite are Native People - either Wampanoag or from other Native Nations. Asking staff what Native Nation they are from is a great way to begin a conversation. You are likWampanoag dancing at Plimoth Plantationely to meet some people who are Wampanoag--one of several Peoples (or Nations) indigenous to the southern coast of present-day New England. The Wampanoag have been living here for over 10,000 years.
While their clothing and houses are traditional, the Native interpreters you meet are not role players. They speak from a modern perspective about Wampanoag history and culture. This enables the staff to talk with you about historical as well as contemporary  issues, events and information about the Wampanoag.

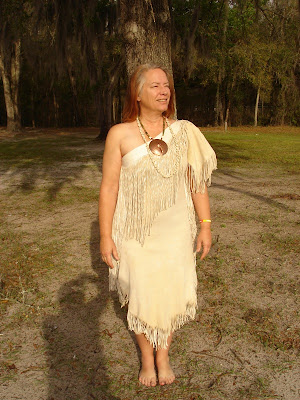
Here are more recent photos from Jamestown and at the end of these pictures is the dress I created to represent this type of garment.
Back of the dress I created
The dress I created

LinkWithin

Related Posts Plugin for WordPress, Blogger...